# Apache Server (LAMP)
#### **Linux, Apache, MySQL, PHP (LAMP) Stack**
{% hint style="warning" %}
Note:
1 You can set up Taxido on different types of clean Ubuntu servers using VPS, including Digital Ocean Droplets, Amazon Lightsail, AWS, Google Cloud Virtual Private Server, Azure Ubuntu Virtual Private Server, and more.
2 If you plan to utilize the scripts (Taxido\_laravel) on a single server as outlined in this tutorial, we suggest setting up a new Ubuntu-based server with a minimum of 2+ CPU cores and 2GB+ of memory for an efficient and smooth operation.
{% endhint %}
### **Introduction**
A "**LAMP"** stack is a bundle of open-source software commonly used to host dynamic websites and web apps written in PHP. It includes Linux for the operating system, Apache for the web server, MySQL for the database, and PHP for processing dynamic content.
#### **Install LAMP**
**Step 1: Installing Apache and Updating package**
Start by updating the package manager cache. If this is the first time you’re using sudo within this session, you’ll be prompted to provide your user’s password to confirm you have the right privileges to manage system packages with apt:
```html
sudo apt update
```
Then, install Apache with:
```html
sudo apt install apache2
```
You’ll be prompted to confirm Apache’s installation. Confirm by pressing Y, then ENTER.
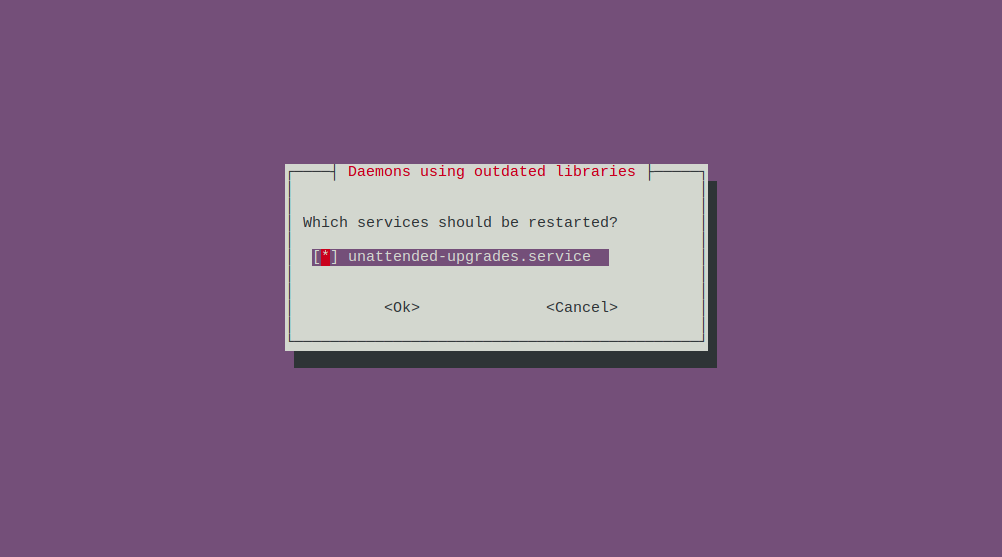
Select unnattended-upgrades options by pressing space-bar, and then press Tab button to select OK button, please Enter button.
**Step 2: Setup Firewall to allow HTTP**
Once the installation is finished, you’ll need to adjust your firewall settings to allow HTTP traffic.
Ubuntu’s default firewall configuration tool is called Uncomplicated Firewall (UFW). It has different application profiles that you can leverage.
To list all currently available UFW application profiles, execute this command:
```html
sudo ufw app list
```
To only allow traffic on port 80, use the Apache profile
```html
sudo ufw allow in "Apache"
```
Enable firewall and verify the change with:
```html
sudo ufw enable
```
After execute this command it will ask proceed this operation with existing ssh connection? Enter "y" and continue it.
```html
sudo ufw status
```
**Step 3: Find your Server’s Public IP Address**
If you do not know what your server’s public IP address is, there are a number of ways to find it. You can following this command to find your public server ip address.
```html
ip addr show ens3 | grep inet | awk '{ print $2; }' | sed 's/\/.*$//'
```
Open this IP address in your browser, If you can view this page, your web server is correctly installed and accessible through your firewall.
**Step 4: Installing PHP**
To install php and mysql, run the following command:
```html
sudo apt install php libapache2-mod-php php-mysql
```
Press "Y | y" to continue this process and Once the installation is finished, run the following command to confirm your PHP version:
To install php extensions, run the following command:
```html
sudo apt install php-mbstring php-xml php-bcmath php-simplexml php-intl php-gd php-curl php-zip php-gmp
```
Once the installation is finished, you can run the following command to confirm your PHP version:
```html
php -v
```
**Step 5: Installing Composer**
Update the local repository lists by entering the following in a command line.
```html
sudo apt update
```
The following curl command to have the latest Composer version.
```html
curl -sS https://getcomposer.org/installer | php
```
This will download and execute an installer script that will download the latest version of Composer and install it in your current working directory.
You’ll need to move the composer to use Composer globally and run the Composer commands from any where.phar file from your current directory to a location included in your PATH environment variable.
The most common location is the /usr/local/bin directory. So use the following command to initiate the move:
```html
sudo mv composer.phar /usr/local/bin/composer
```
To test composer installation, run:
```html
composer
```
**Step 6: Install MySQL Database & User**
Now that you have a web server up and running, you need to install the database system to be able to store and manage data for your site. MySQL is a popular database management system used within PHP environments.
```html
sudo apt install mysql-server
```
When prompted, confirm installation by typing Y, and then ENTER.
Start the interactive script by running:
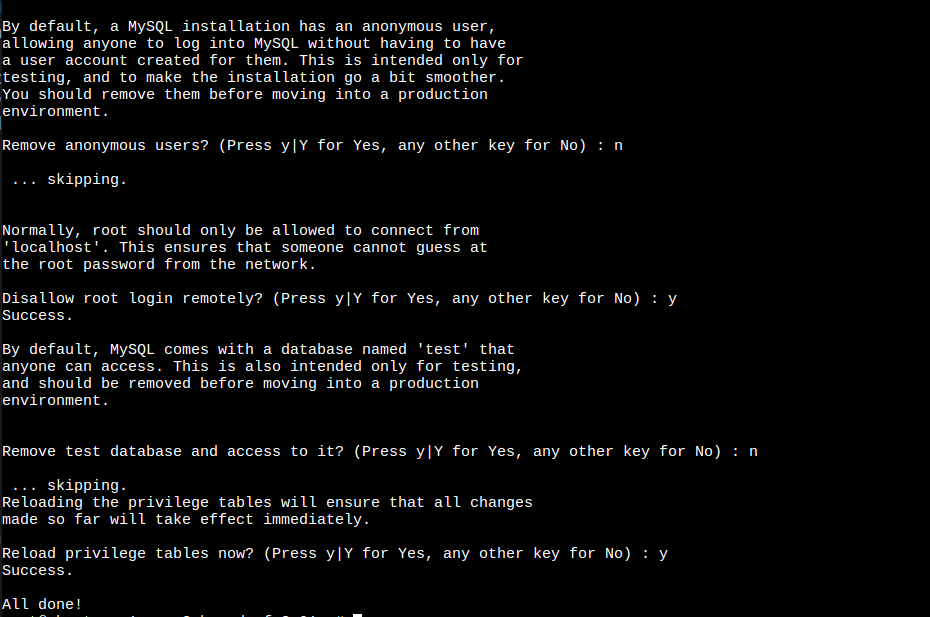
```html
sudo mysql_secure_installation
```
When prompted, confirm installation by typing Y, and then ENTER.
If you answer “yes”, you’ll be asked to select a level of password validation.
{% hint style="warning" %}
If you choose the strongest level as 2, you'll encounter errors when trying to set a password that doesn't include numbers, uppercase and lowercase letters, and special characters.
{% endhint %}
We have choose the medium level as 1, after choose password validation level. It will ask some confirmation you can choose as your need.
When you’re finished, test whether you’re able to log in to the MySQL console by typing:
```html
sudo mysql
```
Once you are entering mysql panel, following some command for create database and database user to store data.
```html
CREATE DATABASE Taxido_laravel;
```
```html
CREATE USER 'Taxido'@'%' IDENTIFIED WITH mysql_native_password BY 'Password@123';
```
```html
GRANT ALL ON Taxido_laravel.* TO 'Taxido'@'%';
```
```html
FLUSH PRIVILEGES;
```
To exit the MySQL console, type:
```html
exit
```
**Step 7: Change permission for the www folder**
```html
sudo chown -R $USER:$USER /var/www;
```
**Step 8: Upload Taxido Laravel to Server**
To make a new directory on your website, just type this command:
```html
mkdir /var/www/Taxido
```
* Download the Taxido-laravel-react\_native-package zip file from CodeCanyon and unzip it on your computer.
* Inside the unzipped folder, find Taxido\_laravel folder
* Upload the Taxido\_laravel folder to the server at the path /var/www/Taxido/.
**Step 9: Install zip and extract it**
following this command to install zip and extract it.
```html
sudo apt install zip unzip
```
**10. Create Virtual Host File**
```html
nano /etc/apache2/sites-available/your_domain.conf
```
Add Following Code in Virtual Host File
```html
ServerName www.your-domain.com
ServerAdmin contact@your-domain.com
DocumentRoot /var/www/Taxido_laravel/public
ErrorLog ${APACHE_LOG_DIR}/error.log
CustomLog ${APACHE_LOG_DIR}/access.log combined
Options -Indexes +FollowSymLinks
AllowOverride All
Require all granted
```
Include the following Nginx configuration in your edited file:
Restart Apache2
```html
service apache2 restart
```
### **Installing Taxido Laravel**
**1. Initially, navigate to the Taxido\_laravel directory, and change the file named .env.example as .env.**
```html
cd /var/www/Taxido/Taxido_laravel
```
Add values to the below keys in the **.env** file using nano command
```html
nano .env
```
```html
cp .env.example .env
```
If you're running your Laravel project on your own computer (localhost), make sure to use localhost with current running port and put in APP\_URL. as a given example below
If you want to install on live server, you need to add your live server Taxido\_laravel url like a APP\_URL=.
```html
APP_URL=http://localhost:8000
DB_DATABASE=database_name
DB_USERNAME=database_username
DB_PASSWORD=database_password
```
{% hint style="warning" %}
Note: Make sure to set the APP\_URL correctly. If you don't, features like uploading, downloading, and showing images won't work properly. Be sure to double-check and make sure everything is set up correctly.
{% endhint %}
**2. Install Required Dependencies:**
In the Taxido\_laravel folder, run following command in the terminal to install the required dependencies.
```html
composer install
```
**3. Generate Laravel APP KEY:**
Once the necessary dependencies are successfully installed, run following command to generate laravel app key.
```html
php artisan key:generate
```
**4. Installation of Taxido:**
{% hint style="info" %}
**Note:** If you've previously run following command or migrated tables, be aware of the fact that it will erase all of your data.
{% endhint %}
Then, run following command to install Taxido database table.
```html
php artisan web:install
```
During the installation, you'll be asked two questions:
1\. Do you want to continue with the installation? If you say yes, Taxido will continue to install.
2\. Do you want to import in sample data? If you say yes, the sample data will be imported. If you say no, the installation will go ahead without adding any sample data.
**5. Link Storage folder to Public folder:**
Then, run following command to store and display images correctly.
```html
php artisan storage:link
```
**6. Run Taxido Laravel :**
Once you've finished all the previous steps, you can run the Taxido Laravel by adding following command.
```html
php artisan serve
```
When you start your Taxido Laravel project, it typically runs on the default port, you can access it by opening [127.0.0.1:8000 ](http://127.0.0.1:8000/)in your web browser.
**7. Verify Taxido Purchase Code:**
Before using the Taxido Laravel, it's important to verify your Envato purchase code.
Enter in your Envato username and the Taxido purchase code and click next button.
If you don't know where to find your purchase code, click here: [Where Is My Purchase Code?](https://help.market.envato.com/hc/en-us/articles/202822600-Where-Is-My-Purchase-Code)
{% hint style="warning" %}
**Note:** Once a license is verified, it can't be used for another project. An envato purchase code can only be verified on one domain at a time.
{% endhint %}
Congratulations, Taxido has been successfully installed and configured in your system!🎉, you can proceed by using the default credentials.
### **Default Credentials**
**Admin Credential:**
Url:
Email:
Password: 123456789
**Driver Credential:**
Url:
Email:
Password: driver\@123
**User Landing Page:** [**https://your-domain.com**](https://your-domain.com/)